- Type
- Instrument
- Author
- opticon93
- Version
- 1.3
- License
- AttributionNonCommercialShareAlike
- Live version
- 11.3.4
- Max version
- 8.5.3
- Downloads
- 753
- Updated
- 2025-10-28
Description
Hi,
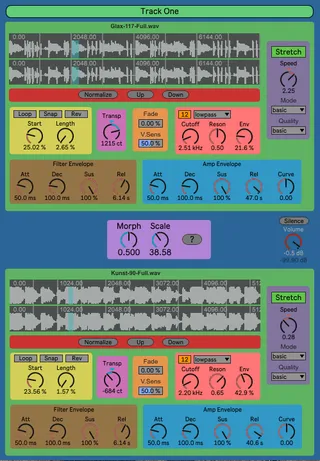
This device spectrally morphs two samples. The samples are loaded into modified "More Simpler" devices, each with 5 note polyphony. Most of the controls are self-explanatory and should be familiar from the "More Simpler" device.
Midi Note controls the pitch of both samplers. When Stretching is off, the Pitch is changed by speeding up/down the sample, like a record player. When Stretch is on, Pitch and Speed are decoupled, so you can slow it down or Speed it up, without changing the Pitch.
Each sampler has a 12-24db Multimode Filter with a dedicated Filter Envelope and a dedicated Amp Envelope.
You can transpose either sample up or down 2400 Cents.
Dragging up and down on the waveform window allows you to zoom in and out.
Many of the knobs have a higher resolution than what is displayed. In particular, the Start, Length, Cutoff and Speed parameters go through more values "under the hood" than what are displayed. Consequently, when you are using the arrow keys on your keyboard, it might seem like nothing is happening, but it is. Use Shift + Arrow Up/Dn to go faster.
Because I use Start and Length, you can scrub through the file just by changing the Start knob, instead of needing to adjust Start and End values separately.
The Rev button works in the same strange way that it does for More Simpler. Not quite sure what it is doing.
The Normalize, Up and Down buttons modify the volume of the loaded sample in a permanent way.
The Morphine object has two controls. The Morph control is similar to a regular crossfade mixer, but it really is different and hard to explain. It's kind of like this. When the Morph is at Zero, any frequency bins of the first sampler that are above 0% (all of the nonzero ones) will be used in the resynthesis. Meanwhile, only the frequency bins of the second sampler that are above 100% (none of them) will be used in the resynthesis mix. The end result is that you will only hear the top sampler.
If the Morph is set to .25, then the frequency bins of the first sample that are above 25% (many of them) will be used, while only those bins of the lower sampler that are above 75% (some of them) will be used in the resynthesis. So, you will hear a resynthesis biased towards the top sampler. Like I say, difficult to explain.
All I can say about the Scale control is from the helpfile: "The progression depends upon the exponential transition Scaling value. Larger values widen the transition space between the two sounds." I have no idea what this means, but it definitely has an effect.
Share and Enjoy!!!
Simple Update: I added a Track Title at the top. Just hit the Open button again when you rename the Ableton Track.
Just to make sure people know, I already made the envelopes 60 seconds long
Comments (33)
If you can't hear anything, you need to make sure you are running the most recent version of Live. Several max objects got updated and only run in the newest version.
Odd with the visibility as none of my other max devices disappear behind the DAW when dragging samples into them. It looks like a cool device. Just trying to provide constructive feedback to help.
sorry i'am a complete dumb on the matter. and btw thank you for sharing your devices!!
I put the morphine object up on Google Drive here
https://drive.google.com/file/d/121XaO4-ytHgv9LqjA_jCCJLs5WQmBuGQ/view?usp=sharing
After you download it, put it in you Max folder, probably at Documents/Max 8.
If that doesn't work, I guess I'll need to rework it with regular old spectral convolution like with my FM Convolver and Grain Convolver devices.
Let me know please.
Should I put it somewhere else?
If not, I'm just going to scrap the whole thing.
Hopefully this new version works.
I'm also confused why transpose moves in 38 step increments instead of 1 like usual. Very odd.
It's a cool device and worth developing.
Thanks
Are you on a Mac? For me, Transpose goes in 1 cent increments.
I checked the last update. If I transpose -1 it goes -38.
You can get smaller increments when mousing the knobs by holding the shift key.
Any chance we could convince you to re-compile that binary?
It took about five years of waiting just for the 64bit Win version of FFTease to appear in an obscure forum post on the Max site: https://cycling74.com/forums/fftease-max7-osx
They mention that it should be easy to compile the binaries because there is an "xcode" file in the github here
https://github.com/ericlyon/FFTease3.0-MaxMSP
I don't know that much, so I really don't know how to compile a mac program on a windows computer.
I do t know much about it either but I’ll take a look at that Xcode resource and if I can figure it out then I’ll let you know.
Thanks again for your work!
https://maxforlive.com/library/device/10037/morphiner-g
Thank you for a great device, @Opticon93