- Type
- MIDI Effect
- Author
- mlostekk
- Version
- 3.0
- License
- Attribution
- Live version
- 9.0.1
- Max version
- 6
- Downloads
- 6
- Updated
- 2020-07-07
Description
This is the successor of the pure python based steq2.0 (http://www.youtube.com/watch?v=-jywWlDTmf0)
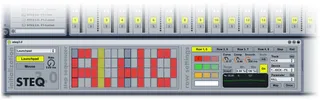
This version is max4live based and runs with the official launchpad remote script. Just drop the max device onto a midi track. Here a quick introduction to the 3 sections of the device (a more detailed tutorial video will follow)
INITIALIZATION:
The dropdownbox is used to select the device you want to use to control the plugin
The launchpad button is equivalent to the user mode 2 button on your launchpad and enables the device
The mouse button enables the mouse control of the step sequencer to the right
The rate knob allows adjustments of the update rate. The higher the rate, the more accurate the plugin, but the more cpu load it will need
STEP SEQUENCER:
This step sequencer is the main part of the device. It has 16 steps and maps to the launchpad via splitting the launchpad matrix into 2 parts. The upper and the lower half. The upper represents the first 8 steps, and the lower part the last 8 steps. There are 4 rows that can trigger an on or off value. Is an element in on state, the plugin will fire an on event if the step before was in off state and vice versa. The target of the on/off value, the transition between these two states and some further settings can be set in the row settings to the right
ROW SETTINGS:
First of all you can set a color for each of the rows, a separate color for the highlighted current step, and a separate color for the "rail row" of the step sequencer. The rail row index can also be specified.
To switch between the customizable parts select a tab on top of the section
Each of the main rows can trigger a different ableton parameter. Nearly all parameters are valid targets (mixer controls, device parameter controls etc). To map a parameter just click the "map" button and move the desired ableton parameter. If you want to disable the "map"-ping after the first parameter was changed and selected, hit "once"
You can select the desired parameter also via the dropdown boxes. (to refresh the dropdown box hit "list") Select first the track, then the device and finally the parameter to bind to the rows on/off states
The "curve", "comp" and "smooth" knobs allow a fine adjustments of the transition from between on/off states. The "init" button resets these parameters
The "range", "min" and "max" controls allows you to adjust the range that the parameter will use for on/off states.
The big fat "on" buttons enables or disables the automation of the target parameter
FEATURES:
launchpad user mode 2 init
customizable row colors
customizable step index highlight color
customizable step rail row and color
mouse control (be careful, full redraw of launchpad lasts longer with more led"s in on state)
NOT YET IMPLEMENTED:
proper color initialization
sync row reset (reset a row to pure off states after a specified quantization)
adjustable quantization
unique python remote script for some optimizations
transparent rail row color will overwrite the on/off states -> fix
prepending step buffer to decrease delay effect
Comments (7)
Unfortunately i am currently travelling without the launchpad, so no way to test the connection to the device. But some questions, did you assign a parameter to the rows? Did you select the launchpad in the dropdown box and enable the launchpad with the button "Launchpad" below? Is the stepper working without the launchpad (i could check that, and its working for me)
By the way, you can find my blogpost here http://www.martynmlostekk.pl/_crunchtime/steq3-0/