- Type
- MIDI Effect
- Author
- cblomert
- Version
- 1.2.1
- License
- AttributionNonCommercialShareAlike
- Live version
- 8.1
- Downloads
- 3,959
- Updated
- 2010-02-19
Description
TouchControl - Control Ableton from your iPhone or iPod Touch
PLEASE DOWNLOAD COMPLETE PACKAGE INCLUDING TOUCHOSC TEMPLATE BELOW:
http://dl.dropbox.com/u/4129457/TouchControl1.1.zip
http://dl.dropbox.com/u/4129457/TouchControl1.2.1.zip
Changelog:
TouchControl 1.2.1
Changed Master button page 2 for Start / restart button, allowing the user to remotely reset the m4l device and output all data to the phone (have to insert ip & port and press start once before - can use TouchMouse app for this for example ;) )
Changed Master button on page 3 for a Play / pause transport toggle
Is anyone missing the Drums page? otherwise i'll just exclude it from TouchControl till the ipad is out
1.2:
- Removed Drum page
- Added Device page with 36 Faders that automap to any selected device (not only racks) including name & value feedback
1.1
- Complete rebuild of the Cliplauncher. Handling Clips & feedback from toggles like arm / mute / solo etc through LiveOSC now. This requires you to install LiveOSC as a midi remote script (see readme.txt). However this drasticly changes performance and reliability for the better.
- Colored grid around the currently viewable clipmatrix (change color by selecting a different position for LiveOSC in the Control Surface options) http://dl.dropbox.com/u/4129457/grid.png pink is the new red.
- Tapping in an empty clipslot now stops the corresponding track.
- Tapping in an empty clipslot in an armed track now creates a midi/audio clip and starts recording (depending on quantization)
- Changed layout a bit
- Added Hotkeys for Returntracks C & D on Device Page
- Added Labels that indicate currently selected track & device on Device Page
- Changed Start Button to actually reset the whole thing aswell. If you experience any errors like faders moving wrong parameters, missing feedback from clips etc, just press the start button and everything should be back to normal.
Hope some of you give it a try :)
Big thanks to ST8 from the monome community - http://monome.q3f.org/ - for his wonderful LiveOSC :o)
REQUIRES TouchOSC on iPhone or iPodTouch to work.
TouchControl Wireless Controller for Ableton Live
Features:
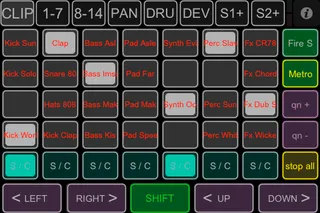
1. Page Clips:
http://dl.dropbox.com/u/4129457/clips.PNG (the colors are actually a little different on the phone)
7x4 Cliplauncher Matrix, Scrollable with dedicated buttons, Name & Playing Status Feedback.
Extra Functions: Scroll View, Solo/Cue, Fire Scene, playing quantization + -, Metro on off. Shift, while being pressed, changes the solo/cue buttons to Stop buttons, also Shift-key has to be pressed for the stop all button.
2. Page 1-7
http://dl.dropbox.com/u/4129457/mixer.PNG
Mixer Page for Tracks 1-7 + Mastertrack. Including Volume Faders and Buttons for Arm / Mute for each track. output-level feedback through little faders in the back. Feedback of Track and Active Clip-names
3. Page 8-14
Same as 2nd page for Tracks 8-14 + Mastertrack
4. Page Pans
http://dl.dropbox.com/u/4129457/pan.PNG
Pans for Tracks 1-14
5. Page:
Version 1.1:
Drums
http://dl.dropbox.com/u/4129457/drums.PNG
16 Drumpad Buttons that automap to the viewable drumpads on any drumrack.
Needs extra maxpatch + enabled Control Surface in Ableton prefs to work.
Version 1.2:
Device
http://dl.dropbox.com/u/4129457/dev.PNG
36 faders that automap to the first 36 parameters of any selected device. name & value feedback. other buttons provide functionality to select tracks / devices, jump to returntrack A - D or enable / disable selected device.
6. Page Device-Rack
http://dl.dropbox.com/u/4129457/device.PNG
8 Faders automap to the first 8 controls on any selected device or device rack. Buttons provide support to change tracks, devices, turn selected device on / off or jump to return tracks A / B
7. page Sends 1-7
http://dl.dropbox.com/u/4129457/sends.PNG
Provides Faders for Sends A/B for Tracks 1-7
8. Page Sends 8-14
You can always add more pages with the controls you need to the layout using the TouchOSC editor. Have Osculator or puredata listen to port 8003 to translate the OSC messages to Midi. You can then map these in Ableton via midimap.
That's it!
Enjoy :-)
Installation Notes:
For Version 1.2:
1. Sync TouchControl.touchosc to your phone via the TouchOSC Editor.
(Incase you can't sync the template to your phone and you are on an Adhoc network (the kind of network you can create on your laptop for example) then please try to sync with your computer and the iphone connected to the same "regular" wireless network (e.g. from a router) Apparently fixes some bonjour issues the editor keeps having.
2. Put Folder LiveOsc into your Ableton's Midi Remote Script folder:
Example for Windows:
C:/Program Files/Ableton/Ableton 8.1.X/Resources/Midi Remote Scripts
MacOSX:
Applications -> Ableton -> Ableton 8.1.X -> Rightclick (ctrl + leftclick) "Live" select "Show package contents" -> browse to AppResources -> Midi Remote Scripts
3. Select LiveOSC as a Control Surface (don't need to select input / output ports)
If LiveOSC gives an error or - after doing the whole procedure below - you still don't get any clipnames / mute / solo / arm / track name but volume / pan / send feedback - please install Python version 2.5.1 to match Abletons internal version.
4. Put TouchControl.amxd anywhere in your set, start your iphone, select and load template -> insert IP / Ports & press the shiny button within the M4L device in Live.
5. Watch your phone soak up the data ;-)
Press Start button again to reset the whole app and return to point blank. If you get no feedback at all check the network settings within TouchOSC and the M4L device again. Network settings example is shown in network.png
(only) For Drums (version 1.1):
1. http://dl.dropbox.com/u/4129457/tcdrum.png
Start TCDrums.maxpat with either Max MSP or Max MSP Runtime. Select internal Midi Bus that you're gonna use.
On OSX you can use "from MaxMSP 1" or "from MaxMSP Runtime 1". On Windows something like Midi yoke should work.
2. Go to Folder "TouchControl" open UserConfiguration.txt
3. Change
InputName: from MaxMSP 1 <-- change to the Bus you selected in TCDrums.maxpat (exact name, including numbers)
OutputName: to MaxMSP 1 <-- shouldn't be needed. Change to corresponding input Bus just in case ;-)
4. Move Folder "TouchControl" with the UserConfiguration.txt inside to one of the following:
[Windows boot drive] > Users > [username[ > AppData > Roaming > Ableton > Live [version] > Preferences > User Remote Scripts
or (Mac OS)
[boot drive] > [Library folder] > Preferences > Ableton > Live [version] > User Remote Scripts
5. Select TouchControl as Control Surface (should be at the bottom) and use the same Midi busses for in and output that we used earlier in the .txt and TCDrums.maxpat.
Done! now the Drumpads should work aswell. If you want to use them in the future you'll have to run the TCDrums.maxpat next to the M4L Device
Comments (23)
I'm new to Max/MSP, but I will use your device to learn and customize my own Control. Maybe the interface can be somewhat cleaner. I will post a new version of it when I am ready with it. Thanks for the good work!
It's actually way to fully featured for me as i'm not going to use the iphone as a replacement controller for the APC40 but it makes an awesome x/y pad controller....
Any chance of posting a video tutorial or two on how you got everything going? This patch is inspirational!
Cheers
D
Ma be one day, it can replace my Lemur,
but for this it need a good stepsequencer as well!
Great Work
thx Jannis
and did you recognize you are faster then the Mutants they have no M4L
device released since now
thx again for this!
Jannis
Thanks for sharing!
Rob
unfortunately some things are not working (Live doesn't react to the input):
Panning
Device Control
Clip Launching
The newest update should fix most issues that were present in the old version, so to all the people that had problems: Feel free to try again! :-)
@S4racen: I'll make a video in the next few days and add the link to the description! You can also add more pages to the layout with X/Y pads for example and have Osculator or similiar software on windows listen to port 8003 to translate the OSC to midi messages.
@Jannis: a step sequencer is the next item on my to do list :D
@verstaerker: could you try the newest version?
@Rics: You have to press the "Shift" Button at the same time as the stop all button, to make sure people don't press it accidently while navigating the grid.
The Shift button also turns the S / C Buttons into stop buttons for that particular track.
If you have any kind of feedback / critics or feature wishes etc - feel free to contact me via email: [email protected] - always appreciated :-)
Cheers
Chris
I rememebr that i've tried also with the shift woithout success.
By the way i'll try with this new updated!
you're really getting somewhere with this app!
I Have compared the TouchControl 1.2.1 on an Iphone 3Gs and a 2 Gen Ipod touch.
Has anybody noticed this or is it my imagination or is the slightly more powerful 3Gs work more smoothly?
Actually the 3 Gs seems to work better with my
TouchOSC-Osculator-Live setup when I have parameters updating back to the Iphone.
-How about dedicated scene firing buttons on the Clip page?
I have become used to being able to fire a scene with one button push.
Seems important to me as Scene Firing is a big point for myself in making music with Live!
Thanks Christian,
AL
But I can only get this to work using the default IP range 192.168.2.xxx
I had to reconfigure my Airport to this IP range.
My current network is set up to work on 192.168.178.xxx
I even tried to change the IP in the device and saving it as a preset and in Live.
No joy... :-( When recalled, it would always show the default IP.
Do I really need to reconfigure my whole network?
Great work!!!
Thanks
It should work with every kind of ip range:
The input fields are more like commands that you can send to the m4l device - the message is only sent once after hitting the "Start" button though and the input fields are reset on device-reload. Means: you have to put in your own ip everytime you load the device - and then press "Start" to have the device work with these values.
You could also hardcode your own ip values into the device with a small change:
Open m4l device, unfreeze, enter patching mode
Change the ip & port written in the input fields to your own, then change ip and port after "udpsend 192.168.2.10" and "udpreceive 8000" to match your own - save the device and reload it. You should now be able to just load the device, press start and have it working :-)
let me know how it worked out!
@ Al
Scenebuttons incoming, expect a mail tonight or tomorrow with some progress :-)
Cheers
Chris
But, I miss the drumpads. It would be great to have them back in a "dums edition"
Thanks,
Chrim
thanks
tellef
I've tried it on my iPhone and iPad and I get the same results on both.
When I route OSC through OSCulator and map it to midi I get perfectly smooth interaction and no jumpyness, any thoughts on what I might try to do to get this working? Looks like a ton of fun!
S
first of all: theres going to be a dedicated app for the ipad, can't tell an exact date - but it's on the way :)
@Chrim: pads will make a return, on ipad aswell as on iphone.
@tellef: look at the network.png provided, it should clear up the ports issues. only important part is that the ports on phone and m4l device match.
@helloworld77: That's because live reports values back to Touchcontrol , which it doesn't when using osculator. Each time you move the fader on touchcontrol a package is initiated to be sent to the computer with the new value - from there the valuechange gets recognized and sent back to the phone. So it goes 2-ways. It's made so that the device also shows changes you do in live.
if you have an unstable / bad wifi connection this can make the faders jumpy etc.
I'd try and use a direct AdHoc connection to your laptop (create new network on MacOSX) - let me know how that worked out :)
and now.. back to coding on the ipad version ;)
Best
Chris
Is there any way on this good earth to get some feedback from the looper plug-in? I would love to have its scrolling bars on my phone, so I can be away from the computer and know my looping status...
Thanks!
Dan
please share it soon;)
Thx for sharing, please some advices,
tom
My new Problem is Massive and this Device. I only can assign one(first) Parameter.
Latency is a problem. Maybe to put out the Levelmeter on the Channels to save Bandwidth.
stay tuned,
tom
Max 6.17
win 7 32bit
Loading the touchcontrol.amxd file crashes Live every time for me. (A serious error...etc)
I have removed all other control surfaces and scripts to check conflicts but this still happens. Any ideas greatly appreciated.